Back tension in archery is the coordinated work of the drawing-side back and shoulder muscles that helps an archer maintain alignment and continue expanding through the shot. It is not simply pulling harder, squeezing the shoulder blades together, or buying a special release aid.
The useful feeling is balanced: the bow arm continues toward the target while the drawing side maintains direction and controlled motion. The exact movement differs between finger-shot recurve or traditional bows and compound bows using a mechanical release, so a coach should match the cue to the archer’s style.
Key Takeaways
Good back tension supports a repeatable shot by keeping the drawing side active as the archer aims and completes the release. It should feel controlled and continuous, not like a sudden shoulder squeeze or a deliberate yank with the drawing hand.
- Build alignment first; back tension cannot rescue a poor anchor or an over-bowed archer.
- Use a light resistance band and coach-led drills before experimenting with a new release aid.
- For compound shooting, learn safe release handling and the device maker’s instructions before drawing an unfamiliar hinge or tension release.
What does back tension mean in archery?
Back tension describes active, balanced muscular engagement around the drawing shoulder and upper back while the archer holds and continues the shot. Coaches often use it as a cue for maintaining alignment and expansion, but it is not a single isolated muscle action or a universal body position.
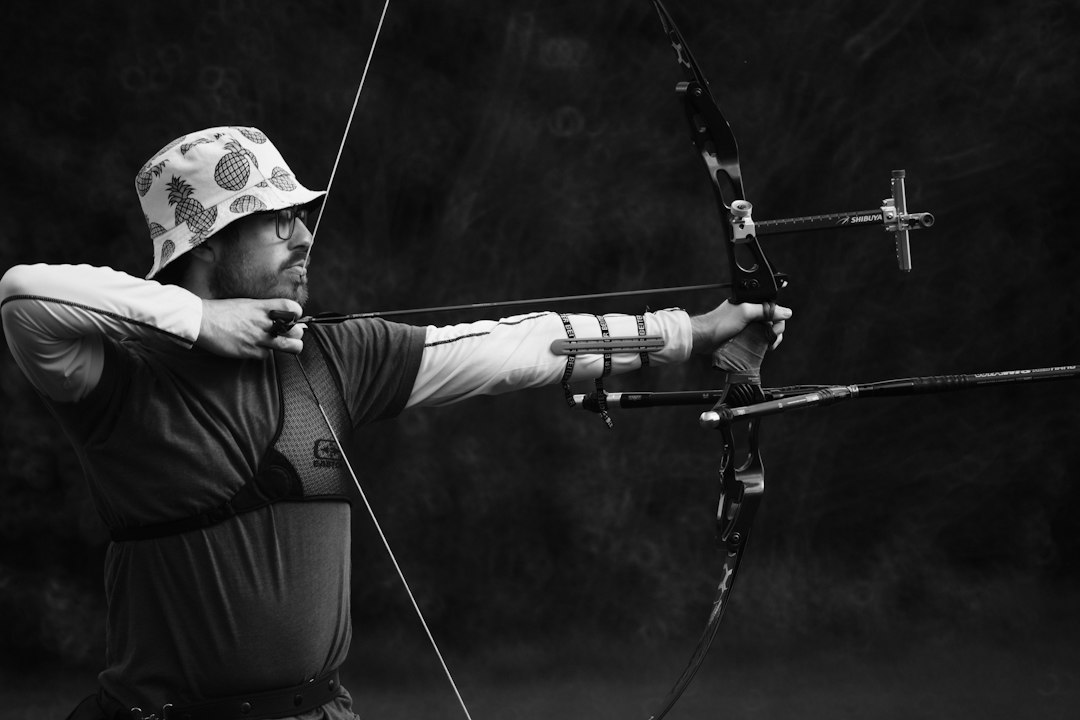
For a finger-release archer, the string arm and drawing elbow continue moving in the shot direction while the bow arm resists forward. The shoulder blade can move and rotate as part of a coordinated action. The aim is not to pin both shoulder blades together; an archer needs room to expand and finish naturally.
The phrase can cause confusion because “back tension” also names a style of compound release aid, often a hinge or tension-activated release. The technique and the tool are related in some training methods, but they are not identical. An archer can use continuous drawing-side expansion with more than one release style, and owning a hinge does not automatically create good form.
World Archery’s coaching manual describes a balanced push-pull action and scapular movement in its discussion of back tension. Use those descriptions as coaching concepts, not as a demand to force every body into the same pose. Anatomy, draw length, bow weight, and discipline all affect what comfortable alignment looks like.
How should the shoulders and drawing elbow move?
At full draw, the bow shoulder should remain stable and directed toward the target while the drawing shoulder and elbow stay aligned with the shot. As the archer completes the shot, the drawing side continues a small, controlled expansion rather than collapsing or yanking the string hand.
A simple unloaded body-awareness drill can help: extend one forearm as if it were the bow arm, place the other hand near the face as though at anchor, then gently move the drawing elbow around and behind the line of the forearm. Notice which upper-back muscles participate without shrugging the shoulder toward the ear. Do not turn a drill into a maximal stretch or a forced shoulder squeeze.
On the shooting line, the “direction” of motion matters more than visibly large movement. A tiny continuation through the shot can be enough. If the drawing shoulder lifts, the bow arm drops, the archer leans backward, or the hand flies away before the arrow leaves, return to a lighter bow and ask a coach to check alignment.
For a consistent reference at full draw, see Suhag Archery’s guide to finding and repeating an archery anchor point. Anchor and back tension work together: a moving anchor can make expansion inconsistent, while a rigid hold without continuation can encourage a forced release.
How do you use back tension without forcing the release?
Use back tension as a steady continuation through aiming, not as a command to squeeze harder until the string suddenly leaves. Keep the bow arm directed, maintain a relaxed drawing hand, and let the release or fingers move according to a repeatable shot process taught by a coach.
For recurve and traditional finger shooting, the fingers relax or move off the string as the drawing-side action continues. The hand often moves back along the face or neck in follow-through. Do not consciously open the fingers early, pluck sideways, or drag the hand away from the face; these actions can disturb the arrow and change its launch.
For compound archers using an index or thumb-trigger release, many coaches teach the archer to maintain expansion and activate the trigger without a sudden punch. A hinge release is rotated by controlled movement and can release unexpectedly if handled incorrectly. A tension-activated release responds to load according to its design. These devices need specific instruction and manufacturer guidance.
Pick one simple cue, such as “continue the elbow around” or “keep the bow arm reaching,” and use it for a whole end. Avoid stacking several muscle instructions on top of aiming, breathing, and shot timing. If the cue makes you tense your neck, change your grip, or lose control of the bow, stop and reassess.
What is the difference between a back-tension technique and a hinge release?
Back tension is a shooting-technique cue about maintaining drawing-side engagement and alignment. A hinge release is a mechanical compound release aid that fires as the handle rotates through a particular range. Some archers use a hinge to train expansion, but the device is not the definition of the technique.
| Term | What it describes | Key coaching point |
|---|---|---|
| Back tension or expansion | Coordinated drawing-side activity and continuation through the shot. | Keep alignment and a steady shot direction; avoid a hard shoulder squeeze. |
| Hinge release | A handheld compound release that trips through rotation. | Learn the safety, loading, and aiming procedure from a qualified coach. |
| Tension-activated release | A compound release that fires when its mechanism reaches a set load. | Understand the exact device adjustment and safe use instructions. |
| Index or thumb trigger | A release aid activated by a trigger using the appropriate finger or thumb. | It can still be shot with a controlled continuation; the trigger should not be punched. |
A new release aid changes how the string is held and how the archer expects the shot to happen. Do not switch devices to fix target panic, inconsistent form, or a poorly fitted draw length without coaching. If you use a mechanical release aid, inspect its strap, jaws, hook, D-loop, and adjustment as directed by the manufacturers.
Suhag Archery carries compound release aids such as the T.R.U. Ball Bandit wrist-strap release. This is an example of a wrist-strap trigger aid, not a claim that it is a hinge or an automatic back-tension trainer. Choose a release based on fit, safe instruction, bow setup, and the style you intend to shoot.
Which drills help you learn back tension safely?
Start with low-risk drills that let you notice alignment without a live shot: body-motion awareness, a light resistance band, or a coach-approved stretch band. Progress to a low draw-weight bow at a close blank bale only when you can control the bow and follow range safety commands.
- Body-awareness movement: Practise the arm and elbow path with no bowstring under load. Keep the neck relaxed and stop if there is pain.
- Light band draw: Use a purpose-made band or light elastic with a coach’s supervision. Rehearse stance, set-up, anchor, a small continuous expansion, and controlled let-down.
- Close-range blank bale: At a safe range, use a suitable low poundage bow and a large close target with no scoring focus. Rehearse the same shot sequence without trying to force a surprise release.
- Video check: If a coach agrees, record from the side or behind the shooting line to review shoulder height, draw elbow path, bow-arm direction, and follow-through.
- One feedback cue: Change one detail per session and record whether the movement remains comfortable and repeatable.
Compound hinge or tension-release practice should be introduced by a qualified coach who can show the device’s loading and safety method. Never aim a loaded bow at a person, draw toward an unsafe direction, or experiment with an unfamiliar release under full draw. Use a safety rope or other approved method only when the instructor and manufacturer recommend it.
What mistakes make back tension feel uncomfortable or inconsistent?
Common mistakes are over-drawing, lifting or pinching the drawing shoulder, locking the elbow, trying to squeeze the shoulder blades together, and using a release aid that is too heavy or unfamiliar. If the action creates pain, tingling, or loss of control, stop shooting and ask for help.
Back tension does not mean “pull as hard as possible.” Too much muscular effort can make the bow shake and the face or neck tighten. Nor does it mean holding indefinitely at full draw. If you cannot continue the shot safely, let down under control, rest, and lower the workload or bow weight with your coach.
A collapsing shot is different from an intentional release. If the bow arm falls, the drawing elbow moves forward, or the archer loses contact with the anchor before the string leaves, the archer may be relaxing rather than expanding. A coach can tell the difference in a way an online description cannot.
Another common error is treating the follow-through as a pose to imitate. Let the hand, elbow, and bow move naturally after release while the archer stays balanced. For more on keeping the body stable before the shot, see Suhag Archery’s archery stance guide and the compound and recurve comparison.
How does back tension apply to traditional and Indian archery?
Traditional archers also rely on coordinated shoulder and back movement to draw and hold a bow, but the grip, draw hand, anchor, and release vary by tradition. The same general idea of maintaining alignment can help, while the detailed cue must suit the bow and style being taught.
Some Indian traditional archers shoot using a thumb draw, while others use a Mediterranean or three-finger draw. A thumb ring, glove, or tab may change how the string sits and leaves the hand. Do not transfer a compound hinge-release drill directly to a traditional bow: the string is released differently, and the equipment and safety practices are not interchangeable.
Traditional bows also differ in limb shape, grip, material, and draw-weight curve. Some are longbows or self bows; others are modern laminated bows with traditional profiles. A coach familiar with the specific style can help the archer coordinate the drawing elbow, shoulder, anchor, and follow-through without forcing an Olympic recurve form onto a different discipline.
For any style, training load should be appropriate to the archer’s strength and experience. Pain is not a useful measure of correct technique. Warm up, practise manageable repetitions, and have a coach check whether the bow’s draw weight and draw length are suitable.
How can a coach tell whether back tension is improving?
Look for repeatable alignment, a steady bow arm, a drawing elbow that continues in a consistent direction, a relaxed face and hand, and a balanced follow-through. Improvement means the process is more repeatable and comfortable—not that the archer’s shoulder blades move farther on every shot.
At first, use process observations rather than score. A coach can watch several arrows and note whether anchor remains stable, expansion continues, and the archer lets down when control fades. Video may help reveal a lifted shoulder or a drawing elbow that moves forward at release, but it should be reviewed with a knowledgeable coach.
Keep practice sets short enough that form remains controlled. Fatigue can change shoulder position and hand tension even when the archer feels determined to finish. Record the bow weight, number of shots, drill, and one technical observation; this helps identify when a drill improves or worsens movement.
Sources and further reading
Coaching terms vary between systems, so the references below should complement hands-on feedback. The manuals describe back tension and balanced movement as technique concepts; they do not prescribe one rigid body shape for every archer or endorse a particular release aid.
- World Archery Level 2 coaching manual
- Archery New Zealand Foundation and Development Coach Manual
- World Archery equipment overview
Frequently Asked Questions
What is back tension in archery?
Back tension is coordinated drawing-side muscle engagement that helps maintain alignment and continuation through the shot. It is not simply pulling harder or squeezing the shoulder blades together.
Do I need a hinge release to use back tension?
No. Back tension is a technique cue. A hinge is one type of compound release that some coaches use to teach expansion, but it requires specific safe instruction and is not suitable for every archer.
How do I practice back tension safely?
Start with a light band or unloaded movement drill under coach guidance. Progress to a low-poundage bow at a safe close target only when you can draw, hold, and let down under control.
Does back tension apply to recurve and traditional archery?
Yes, coordinated drawing-side movement can help finger-shot archers maintain alignment, but the exact draw, anchor, and release differ by bow and tradition. Use a coach familiar with your style.
Why does my shoulder hurt when I use back tension?
Pain may come from excess draw weight, poor alignment, overuse, or forcing an unfamiliar movement. Stop shooting and ask a qualified coach; persistent pain warrants appropriate medical assessment.